
As the world becomes increasingly digital, many educators and trainers are turning to online courses as a means of reaching more students and expanding their reach. Creating an online course can be a great way to share your knowledge with others and make a living doing so. One popular option for creating and managing online courses is the LearnDash. It is a powerful and versatile plugin that can help you create and deliver engaging, interactive online courses. In this article, we will provide a step-by-step guide to setting up an online course using LearnDash.
With LearnDash WordPress plugin, it allows you to create and sell online courses. It is a learning management system (LMS) that provides a range of features to help you create, manage, and deliver your courses. With LearnDash, you can create engaging and interactive courses that include videos, quizzes, assignments, and other multimedia content. The plugin also includes features such as user management, course access levels, drip-feeding content, course prerequisites, and certificates of completion.
Additionally, LearnDash integrates with a variety of payment gateways, membership plugins, and other third-party services to make it easier to monetize your courses. Overall, LearnDash is a powerful tool for anyone looking to create and sell online courses on their WordPress website.
Why should you consider creating an online course?
Economic independence and financial security are one of the major concerns in our dynamic economy. Selling online courses can be one of the most effective and least time consuming ways to create an additional revenue stream.
Here are 5 reasons you should start selling your own courses:
- Flexibility: Online courses can be accessed from anywhere at any time, making them a convenient option for people who are busy or have limited access to traditional educational institutions. This flexibility allows individuals to learn at their own pace and on their own schedule.
- Cost-effective: Online courses are often more affordable than traditional educational programs. They eliminate the need for physical classroom spaces, textbooks, and other resources that can drive up the cost of education.
- Scalability: Online courses can be accessed by a large number of students simultaneously, which means that they can be scaled up or down as needed. This scalability makes it possible for educators to reach a wider audience and generate more revenue.
- Expertise sharing: Online courses provide a platform for experts to share their knowledge and skills with a global audience. This can lead to the democratization of education, making it more accessible to people who might not otherwise have access to high-quality educational programs.
- Revenue generation: Online courses can be a source of passive income, allowing educators to earn money while they sleep. By creating a course once and then selling it repeatedly, educators can generate revenue without having to invest time in creating new content.
In this article, we will guide you through the process of setting up an online course using LearnDash.
The ‘How’ of LearnDash!
Let’s quickly go through the simple process of setting up your very own online course using LearnDash.
Step 1 – Install and activate the LearnDash Plugin
To install the plugin, you can purchase it from the LearnDash website and download the plugin zip file. Then, go to the “Plugins” section in your WordPress dashboard, click “Add New,” and then “Upload Plugin” to upload the zip file. Once the installation is complete, activate the plugin.
Step 2 – Create a course
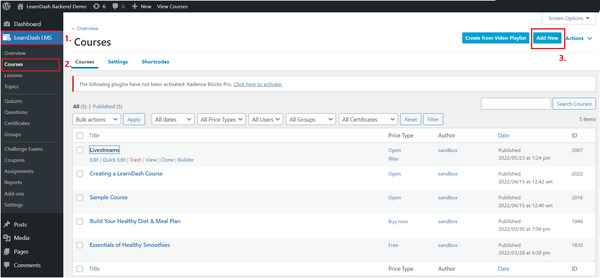
To create a new course, go to “LearnDash LMS” in your WordPress dashboard and click “Courses.” Then, click “Add New.” You can name your course, add a description, and set the course author. You can also choose to enable course access expiration, limit the number of times a user can retake a quiz, and enable drip-feeding content.
Step 3 – Add course content

After creating the course, you can start adding content to it. To do this, go to the course editor and click “Add New Section” to create a new module. You can then add lessons, topics, and quizzes to the module. You can use the drag-and-drop builder to rearrange the content in your course.
Step 4 – Customize course settings
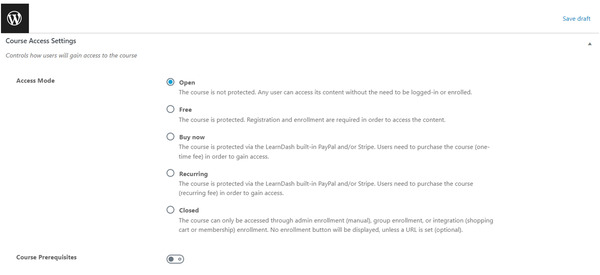
Once you have added course content, you can customize the course settings. Go to “Settings” and choose the “Course Access Settings” tab. You can set the course price, access levels, and enable prerequisites. You can also choose to enable certificates of completion and add a course thumbnail.
Step 5 – Add users and groups

You can add users and groups to your course to manage enrolment. To add a new user, go to “Users” and click “Add New.” You can choose the user’s role, email, and password. To create a new group, go to “Groups” and click “Add New.” You can then assign users to the group and add the group to a course.
Step 6 – Create quizzes and assignments

To create a quiz, go to “LearnDash LMS” and click “Quizzes.” You can then create a new quiz and add questions. You can choose from various question types, including multiple-choice, true/false, and open-ended. You can also set a passing grade for the quiz. To create an assignment, go to “LearnDash LMS” and click “Assignments.” You can create a new assignment and set a due date for submissions.
Step 7 – Publish your course
After customizing the course settings and adding content, you can publish your course. Go to the course editor and click “Publish.” You can then promote your course using landing pages, social media, and email marketing.
Step 8 – Monitor student progress
You can monitor student progress and performance by going to “Reports” in the LearnDash LMS dashboard. You can view student progress by course, quiz, and assignment. You can also see the average grade and time spent on each activity.
Conclusion
We hope we provided valuable insights into LearnDash, a learning management system (LMS) for WordPress, that offers a wide range of features for creating and managing online courses. Setting up an online course using LearnDash is relatively easy and straightforward. By following the steps outlined above, you can create a course that meets your specific needs and share your knowledge with others. LearnDash can be a valuable tool for those looking to create and deliver engaging, interactive, and monetized online courses. Checkout the pricing for more details.