

After months of struggling, you have finally made up your mind to ditch your current host and move to a new host and domain.
Running a successful website – whether it’s a small blog or a complex e-commerce store for promoting your products and services – is a challenging task especially when you face certain issues with your web hosting provider. While managing your website, there comes a time when you plan to move it to a new host. Well, there could be many reasons for making the switch. Your site may have faced a lot of downtimes, resulting in increased bounce rate, or you may be disappointed in the support services offered by your hosting provider or merely because you have found a better option.
Whatever the reason may be, moving your site to a new host and domain can be a challenging chore. If it isn’t carried out accurately, it will cause several unexpected errors on your website. However, if it’s performed precisely, it will be a stress-free experience for you.
To get the job done, you can either hire a professional, seeking a hosting provider that provides the service as part of their hosting plan or take things into your hand and make the switch yourself.
Migrating your website is no rocket science. All you need is a little time and preparation. It is basically a pretty straightforward project provided you approach it correctly.
Well, this is why we are here today. We have written this tutorial to help you migrate your website to a new host and domain while preventing many of the common problems faced during migration.
Step 1: Deactivating all plugins
Before you start, it is usually recommended to deactivate all your plugins as they have the highest tendency of getting failed while moving your website to a new host even though WordPress core is designed to adapt to new changes.
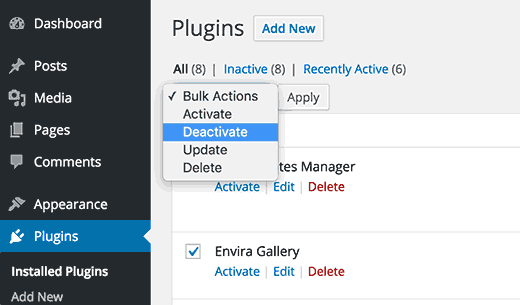
In order to deactivate all plugins, click plugins → installed plugins. It will redirect you to a “manage plugins” page. Choose to deactivate from the “Bulk Actions” drop down menu and hit apply. It will automatically deactivate all your plugins in a matter of seconds.
Step 2: Backup your WordPress site and database
Now, it’s time to backup your WordPress website and database. Though it is a good practice to always backup your site before making any major change, it is actually an utmost necessity when switching your website.
There are basically a few different ways of backing up your website and database. You can use a backup plugin, a manual approach or an FTP program to perform the required job.
Backing up your site and database manually
To manually backup your WordPress site, you will have to use FTP/SFTP client such as Filezilla. Log in to your FTP and download your entire WordPress folder i.e. public_html or htdocs.
To backup your database, log in to your phpMyAdmin and open your WordPress database. You should see an Export option in the top menu. Click on it and choose “Quick – display only the minimal options” under the Export Method and choose SQL from the drop down menu under format. Once done, hit go. It will automatically download your database in SQL format on your computer.
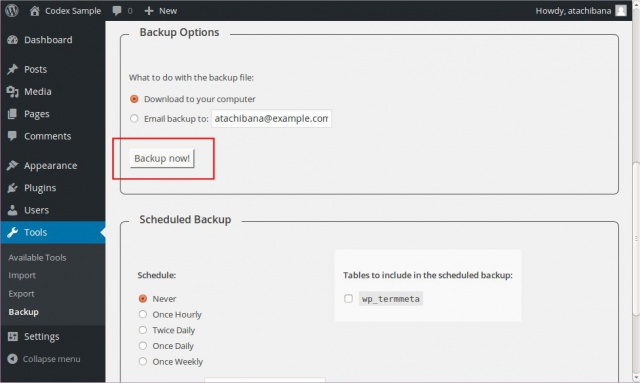
Backing up your site and database with a plugin
WordPress offers a variety of backup plugins which can be installed and used easily and conveniently. In this tutorial, we are using the UpdraftsPlus Backup and Restoration. Upon installation and activation of this plugin, click settings → UpdraftPlus Backups. You will be redirected to the plugin’s backup page where you can backup the whole website in seconds. Click on “Backup Now” button in front of actions.
This may take a while but once it’s done, click on the existing backups tab to download the backed up website.
Step 3: Creating a database on the new host
Before uploading, you need to create a database on your new host. Log into your new host with the credentials provided to you by the hosting provider and open your phpMyAdmin database and click on create a new database with a suitable name. Now create a user with appropriate username and password.
Step 4: Updating the wp-config file
wp-config is one of the most important files on your WordPress website that contains information like your database name, database password, host and more.
For this, you’d need to extract your ZIP archive of the site backup and find the wp-config.php file. Once you have located it, open it to make the necessary changes.
You need to change the below mentioned lines with the information of your new host.
define(‘DB_NAME’, ‘replace_with_database_name_you_noted_down’);
/** MySQL database username */
define(‘DB_USER’, ‘replace_with_new_host_mysql_user_name’);
/** MySQL database password */
define(‘DB_PASSWORD’, ‘replace_with_new_host_mysql_password’);
/** MySQL hostname */
define(‘DB_HOST’, ‘replace_with_new_mysql_host’);
Step 5: Uploading your backup
Now it’s time to upload your backup to your new host. Take your modified WordPress files folder and upload it via FTP/SFTP. Once you have successfully uploaded your WordPress website, upload your database.
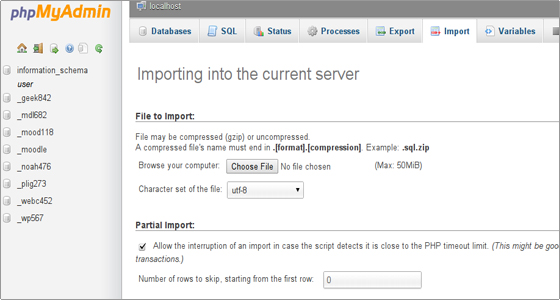
To upload your database, you will need to log in to your phpMyAdmin and click on Import menu. Upload your SQL file and hit go.
Step 6: Defining a new domain and Linking a new URL
If you have added images pointing to a URL on the server or links to other posts, migrating your site to a new host cause these links to break. Thus, it’s important to change these links and define your new domain.
In order to change the URL, you will need to change the home URL and site_url values in the database. Open your wp-config.php file and change the above-mentioned variables with your new URL.
define(‘WP_HOME’,’http://example.com’);
define(‘WP_SITEURL’,’http://example.com’);
You can also use WordPress theme’s functions.php file to make the necessary. Locate the file in your theme’s folder and paste the following lines of code immediately after <?php line
update_option ( ‘siteurl’, ‘http://your_new_domain_name.com’ );
update_option ( ‘home’, ‘http://your_new_domain_name.com’ );
Replace “http://your_new_domain_name.com” with your URL and save your file.
Step 7: Updating permalinks and Reactivating all your plugins
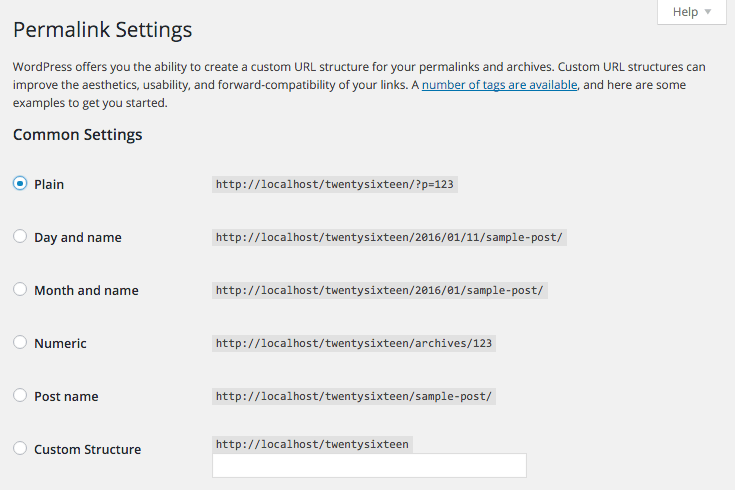
Now that you have successfully migrated your website, you can reactivate all your plugins. After reactivating your plugins, configure your permalinks in settings → permalinks and choose the desired structure and hit save.
Step 8: Redirection
You probably had good rankings on your old URL. To migrate the SEO value to the new URL, you need to configure a 301 redirection.
For this, you need to make certain changes in your .htaccess file in your old WordPress website and add the rewrite rules at the end of the file. This way you can redirect your visitors from old URL to the new one.
Final Words:
We have tried to explain the whole process in a step by step format to help you follow it while migrating your site to a new host and domain. If you still find any problem while migrating, you can for the help by commenting in the comments section below.
I hope you find this tutorial useful.
If you have any suggestions or questions, you can contact us directly from the contact us page or share your reviews in the comments below.