
WooCommerce is an amazing free plugin for WordPress that miraculously transforms your website into a fully functional online store. If you are reading this article, then we assume you are familiar with WooCommerce and its integration with WordPress and are now looking to expand your market and reach to other platforms.
You could list your WooCommerce product information and store information with Google Merchant Center, to expand your venture. Google merchant center is a tool which helps you upload your store and product data to Google and make it available for Shopping ads and other Google services.
What do you need?
In order to export your WooCommerce products to Google merchant center, you need a plugin called WP All Export. The plugin makes it super convenient to export your highly complicated WooCommerce data as simple XML/CSV files using simple drag-and-drop functions. This exported feed then can be fetched by Google merchant center.
Let’s look at the step-by-step guide on how to use the plugin to export WooCommerce Products to Google Merchant Center.
Setup the WP All Export plugin and create a new export!
Download the plugin and setup on your WordPress dashboard. Once you are done, you can click on the ALL Export tab on the sidebar at your WordPress dashboard. Head Over to New Export and decide if you want to export a specific post type or WP_Query Results. In the dropdown menu, ensure that you select WooCommerce products.

If you wish to add any filtering to the products, continue to do so or you can move on to the next step. The plugin will show you how many products will be exported.
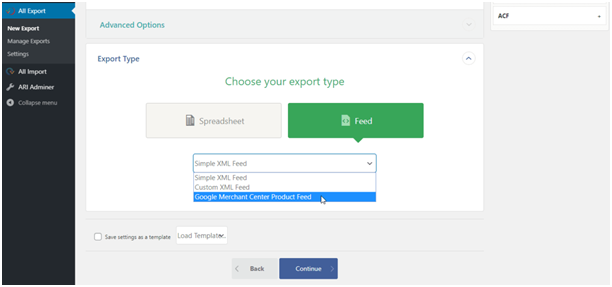
Simply scroll down to the Export Type section and select “Feed” and in the dropdown menu select, “Google Merchant Center Product Feed”.
Fill the required attributes and product information
This is the most crucial step of the whole process. You need to go through a series of sections, fill out the correct product information and attributes before exporting the data. You only need to follow the simple self-explanatory steps to successfully export the data, which can be scheduled to be fetched later by Google merchant center.
The WP All Export plugin uses a simple drag-and-drop function to export your data. You simply need to map product information using WooCommerce values by dragging them from the right hand side of the screen to required fields.
Let’s go through each section in detail step-by-step.
- Basic Product information
The first section contains basic product information, where you can fill in details like ‘Item Title’, ‘Item Description’, etc. Simply drag the attributes from the right side of the screen on to the required field. To begin with, under the “Item Title”, select “Custom data”. It will open up a field, now you can drag-and-drop the attribute {Title} on the field. It’s that simple.
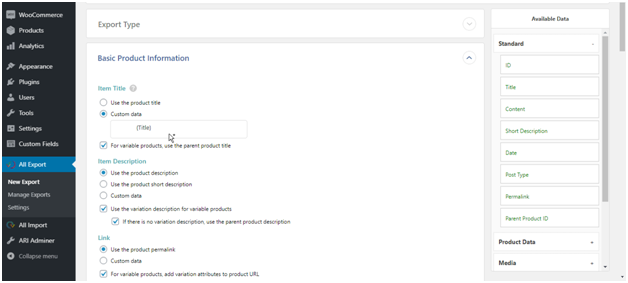
It lets you select multiple attributes. Do the same for the rest of the fields, select appropriate attributes and drop them on the required field.
- Availability and Price
This is the second section where you can fill simple details like “Price”, “Sale Price”, and “Availability”. You can select a custom price from the attributes available on the right hand side of the screen. Interestingly, you can adjust the price for your Google Merchant Center export through the plugin.
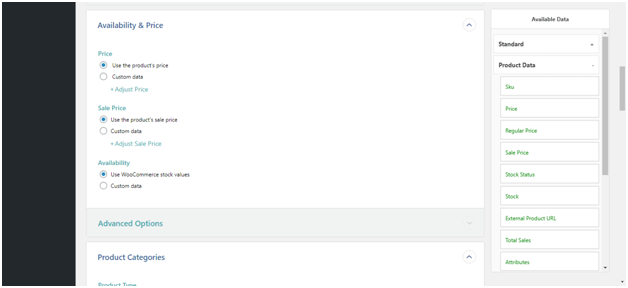
The section also has Advanced Options where you can determine the currency, availability date, sale price effective date, etc.
- Product Categories
Since we are exporting WooCommerce products to Google, for Google to accept them, we need to use Google categories for them, so that they are accepted. For this, we need to Map product categories to Google categories. WP All Export lets you do that pretty easily.

The plugin displays all WooCommerce categories on the left side of the screen. For each product, you can browse for Google categories on the right side of the screen and simply select it. You also have the option to type the category and search for it.
Once you have mapped a category to a parent category, the plugin automatically maps all child categories to that same parent category. In case you have a long list of products, it will save you tons of time.
- Unique Identifiers
Google uses unique identifiers to classify the products, makes it easy for clients to search for your product and set adverts to work better.
The section has fields like GTIN (Global Trade Item Number), MPN (Manufacturer Part Number), and Brand fields. To map them, you can simply drag-and-drop them from the right side of the screen.
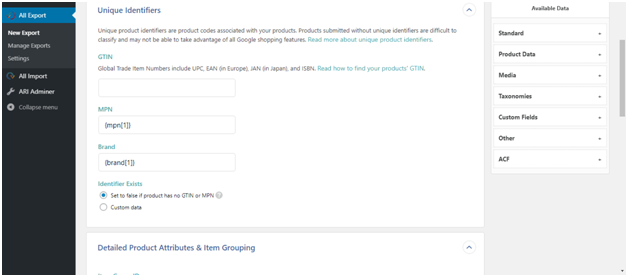
In case you don’t have a GTIN or MPN, you can select “Set to false if the product has no GTIN or MPN” option.
- Item Grouping
For a variable product, each variant is exported as a separate product. Thus, this section helps us map them with Item Group ID. Google requires to group them together using the same group ID. However, the plugin is capable of automatically setting group IDs for you, which brings down a lot of hassle.
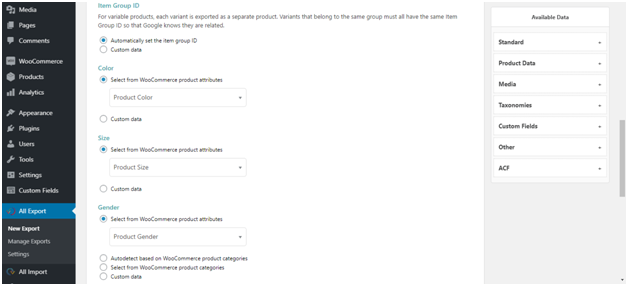
You can now set a color, size and gender of the product as part of the detailed product attribute. Under the Advanced Options you can map the Size Type and Size System, Age Group, Material, and Pattern as required. The plugin can find these values from your WooCommerce attributes but you can also select them manually.
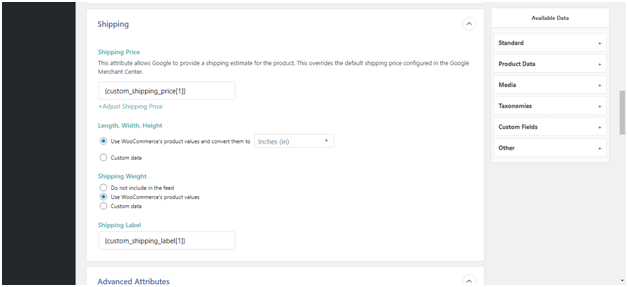
- Shipping
In this section, you can set the shipping price and size. You can define the product dimensions like length, width and height and also determine if you want to export shipping weight and label.
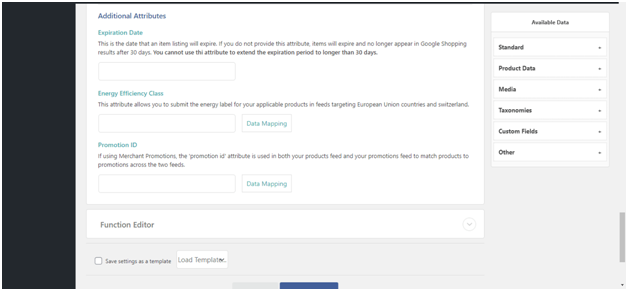
- Advanced Attribute
In Advanced Attributes you can map more complex attributes like multipack value, adult product options, custom labels for AdWords Redirect URL and shopping campaigns.
You can even set unit prices in the following section. You can also select options like Expiration Date, Energy Class, and Promotion ID.
Run the Export!
The plugin lets you schedule your exports so that your Google merchant center is always up-to-date. You can simply set the date and time and the plugin will automatically run to export the WooCommerce product data.
Fetch product feed on Google merchant center
Now that you have exported your WooCommerce product feed, it is time to upload it to Google merchant center. To do so, simply head over to the center and click on “Create a new feed”. Then click on “Scheduled fetch” and give a name to your feed.
Paste the URL given by the WP All Export plugin and fetch and process the feed. It will take some time to complete the process, once it’s done, you will be notified by Google merchant center.
Conclusion
It is really easy to export your WooCommerce products to Google merchant center. The WP All Export plugin makes it super easy and convenient to do so. If you are looking forward to expand your venture, do not stop at WooCommerce and make use of the full spectrum of Google service. For that, you can begin from here!