Placing images on your website is a great way to grab a visitor’s attention, break up long pieces of content, add a visual explanation, and boost the sharing of your content to a wider audience. However, images add a significant amount of size to your webpages if not optimized properly which can affect your website’s overall speed and performance.
Today I am going to share with you an excellent optimization tool called ShortPixel Image Optimizer. Conveniently offered as a WordPress plugin, ShortPixel Image Optimizer will help you to optimize your images so that the excess file size added to your website is practically nonexistent and your webpages continue to load fast for your visitors.
Why Optimize Images?
Before diving into what ShortPixel Image Optimizer is and how it can help you with your website images, let’s consider why optimization is so important to the performance of your website. Here is a quick list of positive effects properly optimizing your images will have on your website after using a tool such as ShortPixel Image Optimizer:
- Faster Page Load Times. Optimizing your images to display as much smaller file sizes than their originals quicken the download process when a visitor clicks on your website. The smaller the file, the faster the page load time.
- Better User Experience. With faster page load times comes a better user experience for those visiting your website. No one wants to wait around for a page to download and optimizing images helps prevent that type of frustrating delay.
- Decreased Bandwidth Use. Too many images will increase your bandwidth significantly and take up more space on your server. This may cause your hosting costs to rise as more space is taken up by images placed on your website over a long period of time. Optimizing images decreases your bandwidth use and therefore you save on hosting costs in the long run.
- Better SERPs. Getting indexed by Google and subsequently found by visitors searching for your website is a plus. With optimized images, your website is more likely to rank well in search engine results which mean more traffic for you.
What is ShortPixel Image Optimizer?
In a nutshell, ShortPixel Image Optimizer is a WordPress plugin offering website owners the chance to bulk optimize images for use on their sites. ShortPixel is installed directly onto your WordPress dashboard and with advanced compression technology, it can reduce image sizes by up to 90% without sacrificing the quality of the image. Take a look at some of the notable features this plugin provides website owners looking to optimize images:
- Support of several file formats – JPG, PNG, GIF (still and animated), and PDF documents.
- Quick backup of original images.
- Easy batch image optimization.
- Both lossy and lossless optimization techniques available (with comparison ability).
- Automated compression.
- Complete data privacy.
- No file size limits.
- One-click original image restoration.
- Compatible with WooCommerce plugin.
- Works well with all major hosting providers, including WP Engine.
- Multisite use.
- Excellent 24-hour support.
Using ShortPixel Image Optimizer
Using ShortPixel is easy to do with image optimization starting immediately after configuring only a couple of settings.
Step 1: Free Account Sign Up
In order to use ShortPixel, you must sign up for a free account. Simply provide your email address and await an email with further instructions.

The email you receive from The ShortPixel Team will inform you that you must first install the ShortPixel Image Optimizer WordPress plugin onto your website.
Navigate in your WordPress dashboard to Plugins > Add New. Search for ShortPixel Image Optimizer and select Install. Then select Activate and look for a new menu item in your WordPress dashboard called ShortPixel, found under Settings.
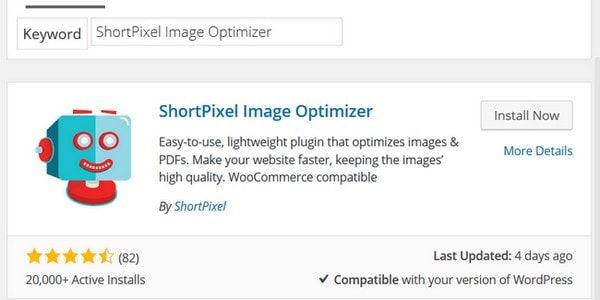
Step 2: Activate ShortPixel Plugin
In the same email informing you to install the ShortPixel plugin onto your website, you will notice a personal API Key has been assigned to you for activating the plugin to begin the optimization process.
When you have your API Key ready to go, navigate to Settings > ShortPIxel and enter it into the appropriate area. Click Validate.
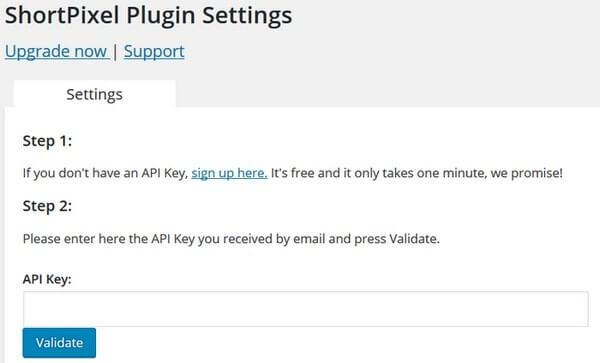
You will then receive a message informing you that your API Key is valid.
Step 3: Configure ShortPixel Settings
In the Settings tab you will be able to choose from a variety of configuration settings so that you get the best image optimization possible:
- Compression Type. Choose from the recommended lossy compression technique or use lossless compression instead. It is nice because ShortPixel explains what each type is to aid you in your decision.
- Thumbnail Inclusion. Decide whether to include your thumbnails in the compression process. Again, ShortPixel provides an explanation and recommendation.
- Image Backup. Choose to keep a backup of your original images in a separate folder.
- CMYK and RGB Conversion. Adjust your images for computer and mobile display.
- Remove EXIF. Select whether to remove the EXIF tag or not.
- Resize Large Images. Great for use on large images taken via your mobile phone, automatically resize them to have specific dimensions once uploaded to your Media Library.
Step 4: Save and Go to Bulk Process
Once you have configured your plugin to the settings you want, save your changes and start optimizing your existent images.
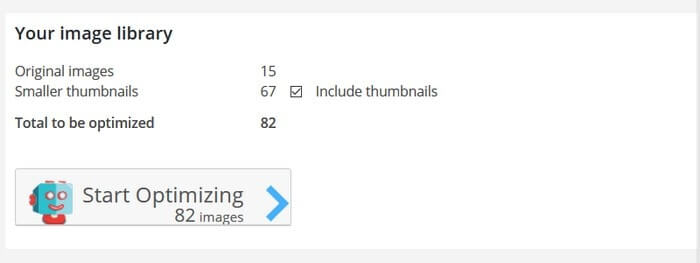
ShortPixel will break down for you how many original images you have, the number of smaller thumbnails present, and will provide a total bulk optimization count. Simply click on the button Start Optimizing.
Once you start the optimization process you must wait for the process to finish. If you have a lot of images to optimize be prepared for this to take some significant time.
A progress bar is displayed so you know approximately how far along in the process you are. A side by side comparison is also provided of the original and optimized image with an optimization percentage.
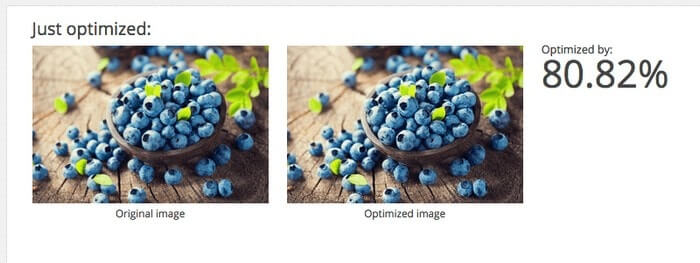
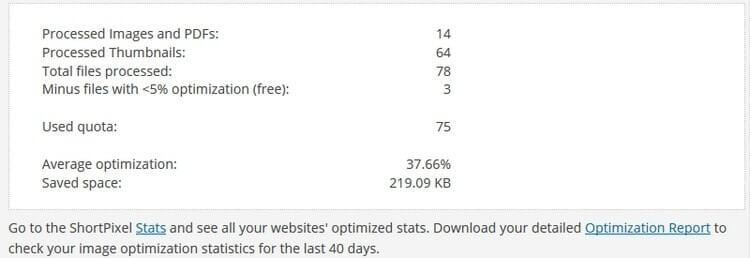
Once finished you will receive a small report detailing the optimization process. It will include information such as the total amount of images optimized, thumbnails optimized, total files that were processed, files with <5% optimization, a total quota that has been used (important for the pricing plans, to be explained next), the average optimization rate, and how much space was ultimately saved. You can also see this information in the Statistics tab located next to the plugin’s Settings tab.
Step 5: About that Account
In the initial email that included your API Key you were also given a password for accessing the account, you signed up for. Here you can change your plan, check out the past 40 days’ worth of optimization statistics, find your API Key, email a friend about ShortPixel, and even sign up for their affiliate program.
Pricing
Each ShortPixel plan comes with the following features:
- 24-hour support (paid plans get priority support).
- No file size limits.
- One API Key.
- Multisite use.
- Lossy or lossless compression.
- Batch automation.
- WordPress plugin required for optimizing images.
The pricing plans are set up based on a monthly quota of images that you would like to optimize. Based on your individual needs you can pick the right plan for you.

You also have the option to make a one-time payment if you have a large batch of images you wish to optimize all at once but do not feel a monthly paid plan is right for you.

Final Thoughts
In the end, ShortPixel Image Optimizer seems very promising as an easy to use solution for optimizing images either already on your WordPress website or those you will soon upload. It has the perfect blend of features, support, and affordability that other image optimizing tools do not.
If you are looking for an easy way to optimize your images, all while lowering bounce rates, increasing conversions, boosting your Google rank status, and driving traffic to your website, I would suggest giving the ShortPixel Image Optimizer plugin a try.
There is also an online image compression tool available if you’d like to test the compression algorithm first.
Have you used the ShortPixel Image Optimizer for optimizing your WordPress website images? How did you feel your images looked in terms of quality after compression? I would love to hear all about it in the comments below!
