
Every business owner scrambles to get as many visitors coming to their websites as possible. More traffic results in more potential customers and probably higher conversion rates. To do so, consistent content updates are a must. Also, you have to make sure your pages and posts are visible to both search engines and users.
So what’s the point of creating private pages? Once hidden from the public, how can people search for or access your content?
To explore the answer, let’s take a look at 5 common use cases of WordPress private pages. Then, we’ll show you how to create a private page with ease. But before digging into details, we should briefly define what a WordPress private page is.
What is a WordPress private page?
As the name suggests, WordPress private pages and posts refer to the content that is visible to certain people only. Unauthorized users will see a 404 page or a custom message indicating they’re not allowed to view the restricted content even when they have the correct URL. You’re able to have the entire page or certain sections of that page private.
There are several methods to shield a page in WordPress, either setting the private visibility status or assigning a password to lock the content. Applying different user roles to restrict access to your content comes as a great option too.
Why creating private pages in your WordPress site?
There may be times when you don’t want the public but yourself or a few specific people to read your content. For example, your company intends to create several pages for internal communication. Other people use protected pages for their personal or family blogs.
1. Internal communication
Getting tired of a huge prevalence of incoming messages? Supporting several email requests from customers has already been a headache. So you certainly don’t want a longer list of unread emails from your colleagues.
It’s when private pages come in handy. Instead of emails, employees can share internal information such as company policies, team goals, private projects, or newbie training via private pages of the company website. Team members, then, can read and leave comments and feedback so that everyone can see them easily.
On top of that, not all employees can view the same private pages. For instance, team goals and rules should be internally accessible by all departments. Still, it’s not necessary to let the Customer Support team or Partners read training documents, except the HR staff and the new hires.
2. Premium or customer-specific products
Not every product brings the same value to your online store. Some can be purchased by all types of customers. However, several limited-edition goods should be viewed and ordered by premium buyers only.
To achieve that, it requires you to create private product pages so that regular clients are restricted from placing these orders.
What’s more, there are some products that must be purchased by certain customers only. Creating private product areas drives attention to their own goods only without prying others’.
E-commerce photography websites can be great examples. After wedding or birthday events, you can share the photos with them via locked product pages without much hassle. Then the customers can pay for those photographs they love.
3. Personal or family blogs
You’ve built a personal blog to jot down daily entries and journals online. At the beginning, you don’t plan to allow the public to read your exclusive content until it gets improved. Simply hide pages that only you, the site admin, are able to access.
Consider securing your family blogs too. Only your relatives can see private pictures or your sharing about a special day of the family. It’s possible for you to surprise them by a gorgeous birthday celebration page without showing it to the whole world.
4. Sensitive and controversial content
There is a trending but controversial topic that attracts the attention of a lot of people, including you. You can create a private page on your blog and share your opinion there. In this way, you’re able to grant access to people having the same point of views only to avoid unnecessary arguments.
After a while when people are less interested in this sensitive subject, it’s time to make it public on the web.
5. Teaser content offering
Last but not least, WordPress private pages authorize you to provide demo or teaser content effortlessly using. Instead of protecting the entire page, it’s recommended to show just the intro and hide the rest of it.
By this way, you easily introduce readers to what the page is about. And at the same time, encourage them to take certain actions such as registering or following your social channels in order to have access to the full content.
Above are the 5 most common cases when you need a WordPress private page. Now it’s time to learn how to create one for your site. There are 2 main methods for you to apply, either using WordPress default features or seeking help from a third-party plugin.
How to create a private page with WordPress default visibility options?
- Enable Private status
WordPress provides a built-in function allowing you to update the visibility of your pages and posts right in the edit screen. Once published, your page will automatically become public to the world. To change this, you should:
1. Log into your WordPress dashboard and head to Pages
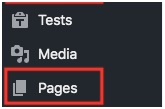
2. Open your desired page
3. Edit the Visibility option at the page’s top right corner and choose Private in the Publish box
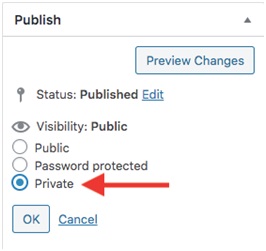
4. Hit OK and update your page
That’s it! Only admins are authorized to open this private page now. Other unwelcome users will be redirected to a 404 error page when attempting to read the content.
What if some specific people in your team need access to this page such as editors, contributors, or customers? In this case, the default Private status doesn’t help though. Don’t worry, there is another solution to try out – password protection.
Password protect your private page
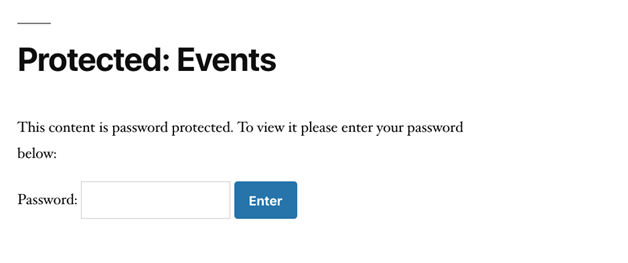
This simple technique covers your WordPress page with a password form. Users have to enter the correct passwords to unlock the content.
You can follow the same process of enabling the Private status to assign a password to your page. Right in the page edit screen, instead of choosing Private, click on Password protected and enter your password. Remember to update your page whenever making any changes.

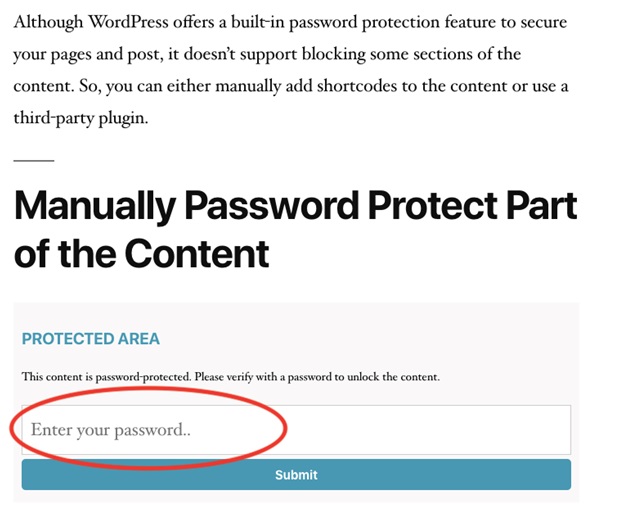
Here is what your page looks like to an unpermitted person:
There are still some limitations when securing your WordPress page with the default password protection feature. You have no way to set more than one password for a page or post.
What’s more, it’s impossible to add another protection layer such as user roles for your passwords. In other words, all types of users with whatever role are able to unlock the protected pages using the correct passcodes.
In addition to that, it takes you a lot of time to password protect numerous pages and posts. You have to visit individual pages and lock them one by one. Imagine there are hundreds of pages to secure, dozens of your precious hours will be wasted.
Hence, those limitations force you to look for a better alternative solution.
Create private pages using Password Protect WordPress Page plugin
Recognized as one of the top free content protection plugins, Password Protect WordPress (PPWP) enables you to create private pages in WordPress via password forms. The plugin solves limitations existing on the WordPress default visibility feature by allowing you to set multiple passwords per page as well as applying roles to them.

PPWP supports not only WordPress pages but also posts, product pages, and any other custom post types. Trusted by thousands of users and receiving an overall 4.5-star rating, PPWP proves an ideal tool to make your WordPress page or page sections private.
Password protect WordPress pages
The instruction below shows you how to get started with the plugin:
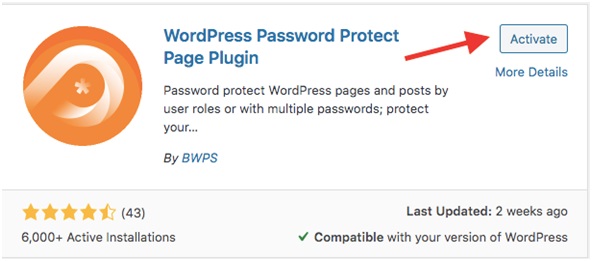
1. Go to Plugins → Add New in your WordPress

2. Type “password protect wordpress” in the keyword box

3. Install and activate the plugin
4. Visit Pages and open the page you want to make private

5. Find the Password Protect WordPress section and insert your passwords
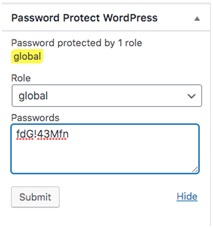
You’re enabled to set as many passwords as you would love to. Each password will display on a separate line. Different user roles can have their own passwords as well. As a result, they must log in and input the right role passwords to get access to the locked content.
Password protect parts of the content
Password Protect WordPress free plugin allows you to secure your WordPress pages partially. This feature benefits you in many different ways. You can create demo content which prompts readers to register to unlock the whole content.
Follow these 3 simple steps to cover sections of your WordPress page with one or multiple passwords:
- Visit the page you plan to lock its content sections
- Place this shortcode in your private content
[ppwp id=”” class=”” passwords=”password1 password2″ whitelisted_roles=”administrator, editor”] Your protected content [/ppwp]
- Update the page
Replace password1 password2 with your own passwords. The whitelisted_roles let logged-in users open your protected content without having to enter the passwords. These people can be admins, editors, the page’s author, or any other custom roles.
Set cookie expiration time
Instead of requiring users to fill in the password form every time they view the private content, Password Protect WordPress saves their cookies for future usage. It means that if the secure content is unlocked with the correct password once, users don’t need to re-enter it the next time they access the page until the cookie expires.

The default expiration time is 7 days. You can easily adjust this number by going to the PPWP settings page → Enter your desired period of time in the Cookies Expiration Time option. There are 3 options for you to choose from, including Days, Hours, and Minutes.
Please notice that the plugin’s lite version doesn’t permit you to shield multiple WordPress pages at a time. Besides, you have to visit the edit screen of every page to set passwords. Fortunately, upgrading to the plugin Pro version gives you full control over more advanced features.
Password protect WordPress pages using PPWP Pro
There are a lot more you can do with your WordPress private pages using the Password Protect WordPress Pro plugin. As mentioned, it enables you to have many pages protected at the same time. You can also generate and manage your passwords in one place rather than editing single pages. Passwords can auto-expire after a given time or a number of clicks.
The following guide helps you upgrade to the Pro version and take the above actions with ease:
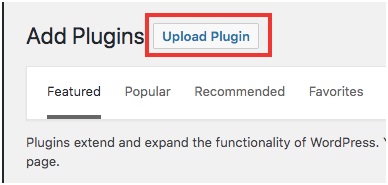
1. Download the Password Protect WordPress Pro plugin
2. Go to Plugins → Add New → Upload Plugin and choose the downloaded zip file
3. Head to Pages and click Password protect under the pages you want to secure

4. Auto-generate new passwords or create your own custom ones

Usage Limit defines how many times users can use a certain password to unlock your private page. Password Expiry, meanwhile, identifies when your password will be deactivated. These features are useful to increase private pages’ security.
To take one example, you provide your students with online training materials which are protected with passwords. After the course finishes, it’s no longer necessary to let them access these pages. By setting the password expiry or usage limit, your passwords will expire automatically, thus there is no chance for students to review private materials again.
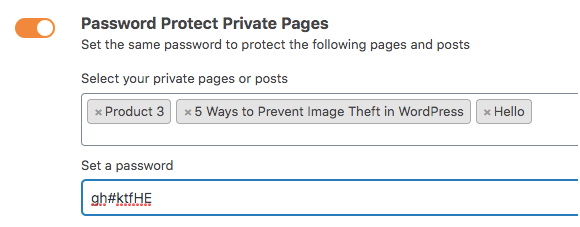
Password protect multiple WordPress pages
Assigning passwords to numerous pages at the same time has never been easier thanks to the Password Protect Private Pages feature. Enable this function right in the plugin settings page. After that, select pages and posts you would like to protect from a dropdown list. Then, enter your password and don’t forget to save your changes.
On top of that, all your child pages will be automatically shielded once their parent pages are password protected. These sub-pages will have the same password with the parent pages.
To achieve this, all that you need to do includes:
1. Toggle the button Password Protect Child Pages in the plugin settings page
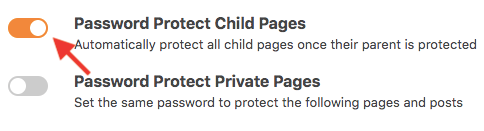
2. Go to Pages and secure a parent page. Hence, all the child pages immediately become private too.
Anytime your user enters a password to view the parent page or any sub-pages, the rest pages belonging to the group are auto-accessible too.
Password protection advanced features
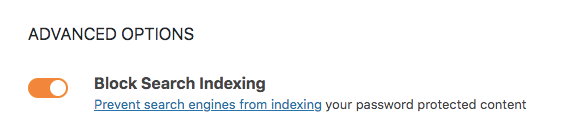
When making pages private, you definitely don’t want any visitors to search and look for them via search results. Therefore, it requires you to discourage search engines from indexing your protected content.
PPWP Pro helps handle that for you effortlessly via the Block Search Indexing feature. It’s enabled by default so you don’t have to take any further actions.
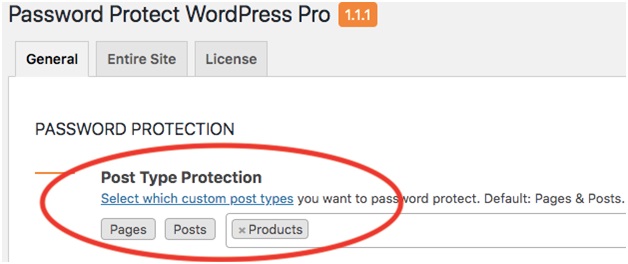
Additionally, there is an option for you to cover product pages or any other custom post type under a password form. Just select “Products”, “Events”, etc. in the Post Type Protection dropdown.
Customizing the password form message shouldn’t take you a lot of time and effort. You’re able to change the default message “This content is password protected. To view it please enter your password below:” depending on the purposes your private pages will serve. For instance, here is a sample custom message: “This training page is password protected. Please enter your password to view it:”
What if your private pages are still visible?
Sometimes, your private pages are still visible to unauthorized users without your permission. In this case, it’s possible that you’re using a cache plugin which contains a copy of your page when it was available.
Another reason comes to password protecting the WooCommerce shop page. In fact, this page doesn’t apply WordPress default password protection method. Despite being locked, it’s still visible to the general public.
To stop these problems, you firstly need to have the cache purged and deactivate that plugin at the same time. After that, you can make the page private or password protected again.
About the WooCommerce shop page, you must use a password protection plugin specially designed for products and the shop page. You can also change the visible capability of this page from Public to Draft so that only admin users are able to view it.
Create private pages for your WordPress site
WordPress protected content supports you in providing business internal communication pages or creating a secret channel for your daily journey.
You’re allowed to make your WordPress pages private with built-in visibility features by enabling you to either set the Private status or assign a password to a page. However, you can’t protect a page with multiple passwords, apply user roles to it, or secure parts of the content.
Wanna solve these limitations and bring the private pages’ functionalities to a higher level? Try Password Protect WordPress free plugin. No longer will you have to worry about setting multiple passwords for a page or force users to log in in order to view your secure content.
Still have a question about how to create a private page for your WordPress site? Leave a comment below to let us know.